conclusion
On Ubuntu, clustering means build it yourself. It can be done and when it's up, it's bulletproof. So, here goes. Breathe deeply and. . .
reference
This guide is an ubuntuified version of our openSUSE cluster post. If you think it's missing here, it'll be there instead.
hardware
Each node needs a minimum of 2 physical network interface cards, one for the cluster traffic between the nodes and the other that goes out to the domain. Here, we use 2 real cards and a virtual bond for the third.
for domain: altea.site
DC: palmera, 192.168.1.132
DNS: palmera, bind9_dlz master for altea.site forwarding 192.168.1.1
node 1: uc1 192.168.1.82, 192.168.1.80, 192.168.1.81 and 192.168.0.10
node 2: uc2 192.168.1.83, 192.168.1.80, 192.168.1.81 and 192.168.0.11
gateway: 192.168.1.1
eth0: domain traffic. nic is disabled
eth1: cluster traffic, no route out
bond0: domain and local traffic bound to eth0
cluster disk
You will need a second disk drive for your cluster data. We have a spare disk installed on each of the nodes which is recognised by fdisk as /dev/sdb. We have partitioned it as /dev/sdb1. We have used sdb1 as the shared storage. Under DRBD the cluster device becomes /dev/drbd1. /dev/drbd1 is formatted with ocfs2. We have drbd primary:primary with both nodes up and mounted.
DNS
Get this right and the rest is easy.
/etc/hosts
127.0.0.1 localhost
192.168.0.10 uc1
192.168.0.11 uc2
If you know the ifup syntax for bonding and you want to mount the cluster partition on boot:
sudo apt-get install ifenslave-2.6
/etc/network/interfaces
# interfaces(5) file used by ifup(8) and ifdown(8)
auto lo
iface lo inet loopback
auto eth0
iface eth0 inet manual
bond-master bond0
auto eth1
iface eth1 inet static
address 192.168.0.10
netmask 255.255.255.0
auto bond0
iface bond0 inet static
address 192.168.1.82
gateway 192.168.1.1
netmask 255.255.255.0
dns-nameserver 192.168.1.132
bond-slaves none
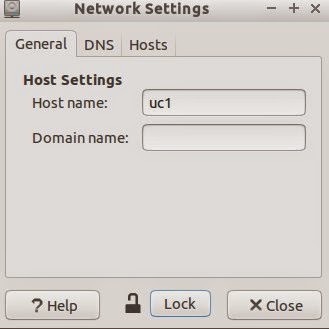
If not, use the pretty pictures to set up DNS as follows. Here are the screenshots for setting up networkmanager for uc1 on node1. Repeat for uc2 but using the second set of IPs from above. But be warned that you will have to use ifup if you want to mount the o2cb startup stuff.


install the cluster and kerberos stuff
sudo apt-get install drbd8-utils linux-server ocfs2-tools build-essential libattr1-dev krb5-user libblkid-dev gdb libgnutls-dev libreadline-gplv2-dev python-dev autoconf python-dnspython pkg-config pam-krb5utils libpopt-dev apparmor-utils ldap-utils libsasl2-modules-gssapi-mit
download and unpack ctdb-2.5.3.tar.gz
then it's just:
./configure && make
and install it:
sudo make install
configure the cluster
/usr/local/etc/ctdb/nodes
192.168.0.10
192.168.0.11
/usr/local/etc/ctdb/public_addresses
192.168.1.80/24 bond0
192.168.1.81/24 bond0
/etc/drbd.conf
global {
usage-count yes;
}
common {
net {
protocol C;
}
}
resource r0 {
net {
allow-two-primaries;
after-sb-0pri discard-zero-changes;
after-sb-1pri discard-secondary;
after-sb-2pri disconnect;
}
startup { become-primary-on both; }
on uc1 {
device /dev/drbd1;
disk /dev/sdb1;
address 192.168.0.10:7789;
meta-disk internal;
}
on uc2 {
device /dev/drbd1;
disk /dev/sdb1;
address 192.168.0.11:7789;
meta-disk internal;
}
}
/etc/ocfs2/cluster.conf
node:
ip_port = 7777
ip_address = 192.168.0.10
number = 1
name = uc1
cluster = ocfs2
node:
ip_port = 7777
ip_address = 192.168.0.11
number = 2
name = uc2
cluster = ocfs2
cluster:
node_count = 2
name = ocfs2
configure the fs
sudo dpkg-reconfigure ocfs2-tools
Setting cluster stack "o2cb": OK
Starting O2CB cluster ocfs2: OK
partition the spare disk
use fdisk to end up with /dev/sdb1 where:
fdisk -l
gives something like:
Disk /dev/sda: 12.9 GB, 12884901888 bytes, 25165824 sectors
Units = sectors of 1 * 512 = 512 bytes
Sector size (logical/physical): 512 bytes / 512 bytes
I/O size (minimum/optimal): 512 bytes / 512 bytes
Disk label type: dos
Disk identifier: 0x000f1bbc
Device Boot Start End Blocks Id System
/dev/sda1 2048 1525759 761856 82 Linux swap / Solaris
/dev/sda2 * 1525760 25165823 11820032 83 Linux
Disk /dev/sdb: 2147 MB, 2147483648 bytes, 4194304 sectors
Units = sectors of 1 * 512 = 512 bytes
Sector size (logical/physical): 512 bytes / 512 bytes
I/O size (minimum/optimal): 512 bytes / 512 bytes
Disk label type: dos
Disk identifier: 0x000ab2e5
Device Boot Start End Blocks Id System
/dev/sdb1 2048 4194303 2096128 83 Linux
create the drbd metadata on both nodes
sudo drbdadm create-md r0
sudo drbdadm up r0
sync the nodes
Be careful. If you have data you wish to keep on either node then choose that node to begin the sync.
sudo drbdadm primary --force r0
wait for
cat /proc/drbd
to stabilise, then make it active
sudo drbdadm primary r0
format the partition
Unless you just want fail-over, you must use something that doesn't crash if mounted simultaneously.
mkfs -t ocfs2 -N 2 -L ubuntucluster /dev/drbd1
mount it
sudo mkdir /cluster
sudo mkdir /cluster
sudo mount /dev/drbd1 /cluster
cd /cluster
sudo mkdir users && sudo mkdir profiles && sudo chmod 1777 profiles
samba
download and unpack the latest samba (ATM 4.1.11.tar.gz)
./configure --with-cluster-support --without-ad-dc --with-shared-modules=idmap_ad --with-ads && make
install it:
sudo make install
/usr/local/samba/etc/samba/smb.conf
[global]
workgroup = ALTEA
netbios name = SMBCLUSTER
realm = ALTEA.SITE
security = ADS
kerberos method = secrets only
winbind enum users = Yes
winbind enum groups = Yes
winbind use default domain = Yes
winbind nss info = rfc2307
idmap config * : backend = tdb
idmap config * : range = 19900-19999
idmap config ALTEA : backend = ad
idmap config ALTEA : range = 20000-4000000
idmap config ALTEA : schema_mode = rfc2307
clustering = Yes
ctdbd socket = /usr/local/var/run/ctdb/ctdb.socket
[users]
path = /cluster/users
read only = No
[profiles]
path = /cluster/profiles
read only = No
winbind
create the stack at /etc/pam.d:
auth sufficient pam_winbind.so
auth [success=2 default=ignore] pam_unix.so nullok_secure
auth requisite pam_deny.so
auth required pam_permit.so
auth optional pam_cap.so
account sufficient pam_winbind.so
account [success=1 new_authtok_reqd=done default=ignore] pam_unix.so
account requisite pam_deny.so
account required pam_permit.so
account sufficient pam_localuser.so
create the winbind links:
sudo ln -s /usr/local/samba/lib/libnss_winbind.so.2 /lib/libnss_winbind.so
sudo ln -s /lib/libnss_winbind.so /lib/libnss_winbind.so.2
sudo cp /usr/local/samba/lib/security/pam_winbind.so /lib/security
create the winbind links:
sudo ln -s /usr/local/samba/lib/libnss_winbind.so.2 /lib/libnss_winbind.so
sudo ln -s /lib/libnss_winbind.so /lib/libnss_winbind.so.2
sudo cp /usr/local/samba/lib/security/pam_winbind.so /lib/security
start the cluster
sudo ctdbd --dbdir=/usr/local/var/lib/ctdb --dbdir-persistent=/usr/local/var/lib/ctdb/persistent --event-script-dir=/usr/local/etc/ctdb/events.d --public-addresses=/usr/local/etc/ctdb/public_addresses --socket=/usr/local/var/run/ctdb/ctdbd.socket --logfile=/var/log/syslog
(tail the logs and wait for them to stabilise)
sudo ctdb status
Number of nodes:2
pnn:0 192.168.0.10 OK (THIS NODE)
pnn:1 192.168.0.11 DISCONNECTED|UNHEALTHY|INACTIVE
Generation:2138318810
Size:1
hash:0 lmaster:0
Recovery mode:NORMAL (0)
Recovery master:0
create a domain user
uidNumber: 3000016
loginShell: /bin/bash
homeDrive: Z:
homeDirectory: \\smbcluster\users\stevep
profilePath: \\smbcluster\profiles\stevep
unixHomeDirectory: /cluster/users/stevep
'posixify' the group Domain Users
gidNumber: 20513
start smbd
sudo smbd
join the domain
on one node only:
net ads join -UAdministrator
start winbind
sudo winbindd
check
id stevep
uid=3000016(stevep) gid=20513(domain users) groups=20513(domain users),19903(BUILTIN\users)
add the round robin A records for the cluster to the DC
host smbcluster
smbcluster.altea.site has address 192.168.1.81
smbcluster.altea.site has address 192.168.1.80
ping smbcluster
PING smbcluster.altea.site (192.168.1.80) 56(84) bytes of data.
64 bytes from smbcluster (192.168.1.80): icmp_seq=1 ttl=64 time=0.863 ms
finally
sudo chgrp Domain\ Users /cluster/users && sudo chgrp Domain\ Users /cluster/profiles
finally
sudo chgrp Domain\ Users /cluster/users && sudo chgrp Domain\ Users /cluster/profiles
Linux client:
sudo mount.cifs //smbcluster/users /cluster/users -osec=krb5,username=cifsuser,multiuser
sudo mount.cifs //smbcluster/users /cluster/users -osec=krb5,username=cifsuser,multiuser
su stevep
Password:
stevep@uc1:/home/steve$ cd ~
stevep@uc1:~$ touch cluster.txt
stevep@uc1:~$ ls -l
total 0
-rw-r--r-- 1 stevep domain users 0 ago 13 10:51 cluster.txt
stevep@uc1:~$ exit
stevep@uc1:~$ exit
bring up the other node
sudo ctdbd --dbdir=/usr/local/var/lib/ctdb --dbdir-persistent=/usr/local/var/lib/ctdb/persistent --event-script-dir=/usr/local/etc/ctdb/events.d --public-addresses=/usr/local/etc/ctdb/public_addresses --socket=/usr/local/var/run/ctdb/ctdbd.socket --logfile=/var/log/syslog
sudo drbdadm primary r0
mount /dev/drbd1 /cluster
sudo ctdb enable
sudo ctdb status
Number of nodes:2
pnn:0 192.168.0.10 OK (THIS NODE)
pnn:1 192.168.0.11 OK
Generation:569123968
Size:2
hash:0 lmaster:0
hash:1 lmaster:1
Recovery mode:NORMAL (0)
Recovery master:0
disable node 1
sudo ctdb disable && sudo ctdb status
Number of nodes:2
Number of nodes:2
pnn:0 192.168.0.10 DISABLED (THIS NODE)
pnn:1 192.168.0.11 OK
Generation:569123968
Size:2
hash:0 lmaster:0
hash:1 lmaster:1
Recovery mode:NORMAL (0)
Recovery master:0
(tail the logs and wait for the takeover to finish)
(tail the logs and wait for the takeover to finish)
kill smbd on node 1
killall smbd
killall smbd
ps aux|grep smbd
steve 18577 0.0 0.1 7124 840 pts/5 S+ 11:07 0:00 grep --color=auto smbd
(wait for the log activity to stabilise)
Back to the Linux workstation, check the fail-over:
stevep@uc1:~$ touch cluster2.txt
stevep@uc1:~$ touch cluster2.txt
stevep@uc1:~$ ls -l
total 0
-rw-r--r-- 1 stevep domain users 0 ago 13 11:09 cluster2.txt
-rw-r--r-- 1 stevep domain users 0 ago 13 10:51 cluster.txt
You now admire your work as you fail-over and fail-back time and time again convincing yourself that it does indeed work. At first, you just don't believe it.
More graphical examples below with both Linux and XP clients working on the same data.
You now admire your work as you fail-over and fail-back time and time again convincing yourself that it does indeed work. At first, you just don't believe it.
More graphical examples below with both Linux and XP clients working on the same data.
Choose your poison: Ubuntu or XP:
 |
| all together now, clusters give you. . . |
 |
| peace of mind. . . |